Using Slither for Smart Contract Security Testing
10 Apr 2024If you’ve spent any amount of time researching solidity security or doing security reviews on smart contract code, you’ve heard of or used the tool Slither from Trail of Bits. Most Slither tutorials I’ve seen don’t provide step-by-step instructions for using the tool from a security auditor’s perspective. Most tutorials only cover the basics of using Slither. But this tutorial attempts to provide a more in-depth view of how Slither fits into my security testing workflow.
Why Slither
Slither is a static analysis tool that often requires no setup on the security tester’s part. If the code compiles with hardhat or several other frameworks, Slither can be used. The lack of any setup process is a key part of why Slither has become so widely used. Fuzzing tools are great, but setup effort is required, so static analysis tools like Slither keep life simple. Unlike other solidity static analysis tools, Slither is regularly updated and maintained, which has played a large part in why it has superceded most (all?) other solidity static analysis tools at the time of writing.
Installation and First Steps
The first step to using Slither is to install Slither. There are several installation options, and using a Python virtual environment is a good practice, but the lazy way of installing with pip is to use pip3 install slither-analyzer.
Next, make sure the solidity version you have installed is the same one required by the contracts. Compare the solc version you have installed to the pragma version in the .sol contract files you want to test. If you don’t have a project that you want to analyze of your own, you can follow along using a well-known public project.
solc --version # this prints the solc version
grep -inr pragma  # this prints the solidity version in your contracts
If the solc version doesn’t match the version number of the contracts, you can get the correct solc version either with the solc-select tool, by keeping separate Docker images for different solidity versions like Scott Bigelow describes here, or by downloading the proper version of solc binary from the solidity github repository and copying it over your existing solc binary using:
# Add `sudo` to this command if it doesn't work without sudo
cp solc-static-linux $(which solc)
To confirm Slither is installed, print the Slither help message with slither -h. If the output shows a long list of Slither command options (as opposed to an error), Slither should be installed properly. The latest version of Slither at the time of writing was 0.8.2.
Compiling the Contracts
Now that you have Slither installed and solc is the correct version, you need to make sure you can compile the contracts without any errors. Normally a project will require the installation of JavaScript dependencies before it can be built. These dependencies can be installed with either npm or yarn. The best approach is to read the project documentation and use the build instructions provided. If there are no instructions, I use a simple rule of thumb. If there is a yarn.lock file in the project directory, use yarn install to install the dependencies. If there is only a package.json file but no yarn.lock file, then use npm install to install the dependencies.
The command used for compiling the project depends on the development toolchain used. If hardhat is used, you should find a hardhat.config.ts or hardhat.config.js file in the top level directory. Make sure you are in the same directory as the hardhat.config.js file when you run npx hardhat compile.
If another development toolchain is used, such as truffle, waffle, dapptools, foundry, etc., refer to the project’s documentation or visit the official website for the proper development toolchain and read the toolchain documentation on how to compile a project with that tool. If brownie or foundry are the build frameworks, you’re out of luck as of early 2022 - see the upcoming section about that.
Running Slither
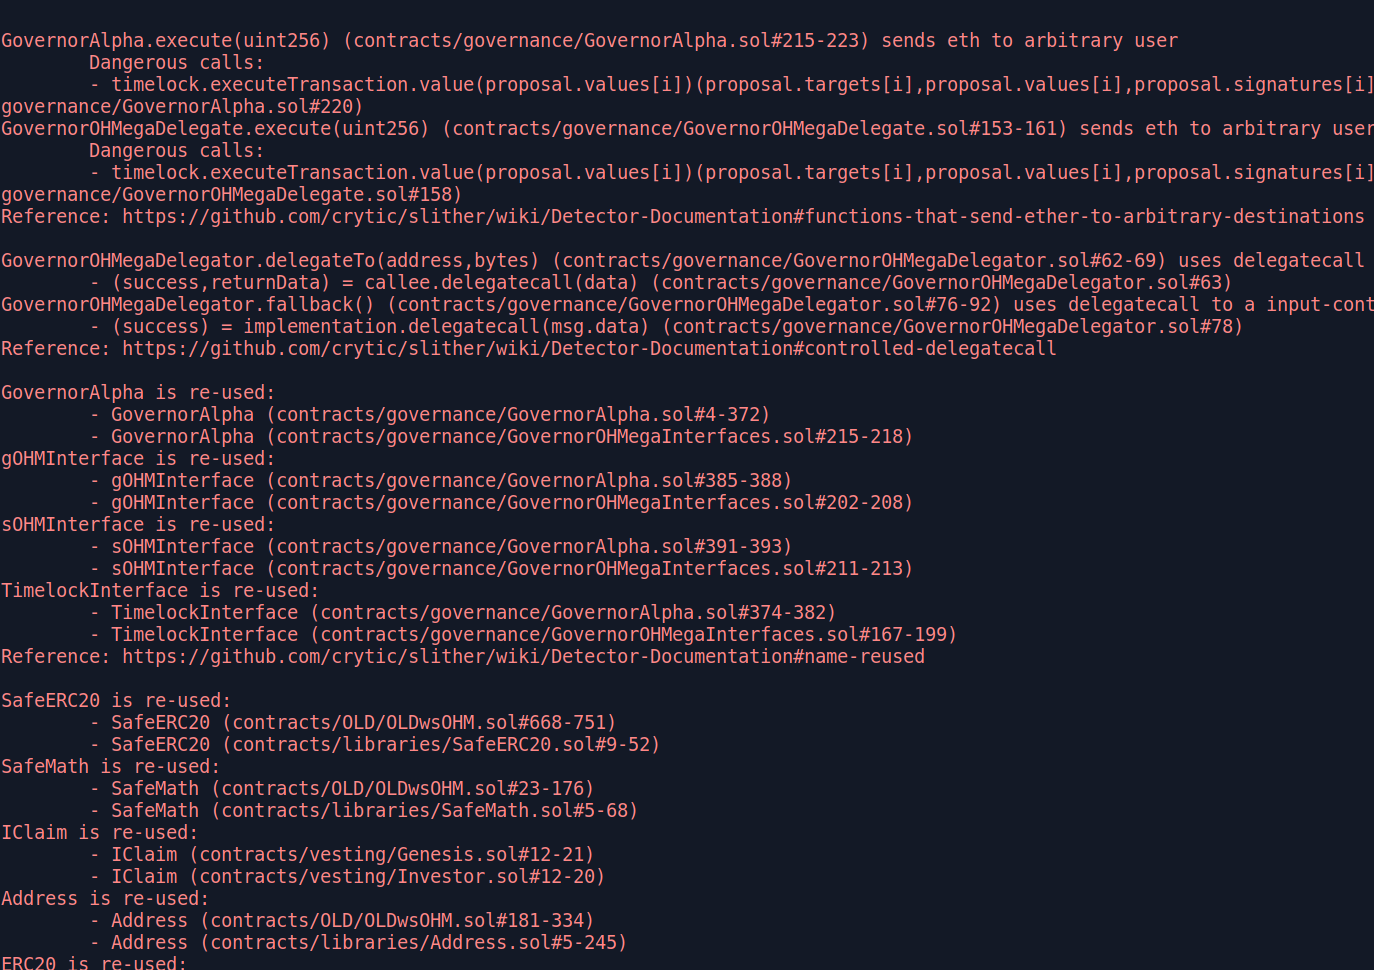
After you have the project compiling without errors using its native framework, it’s time to run Slither. The easiest way to run all 76 Slither detectors is by navigating to the top level directory of your project and running slither .. If all goes well, you should see colorful output like the screenshot below.

Many examples online have more arguments in the command, but you don’t need them for Slither to run successfully. There are many old issues in the Slither repository where users try running Slither with slither ./contracts, but this is incorrect because Slither expects to receive the top level directory of the project, not the contracts directory. By default, Slither will compile the contracts when it is run. If you just finished compiling your contract with npx hardhat compile or a similar command, there is no need for Slither to waste time repeating the compilation, so you can run Slither with slither . --hardhat-ignore-compile to tell Slither to skip compiling the code and save some time. The slither -h help message shows there is a similar flag to skip compilation with waffle, dapptools, etc.
Troubleshooting Slither Compilation Errors
Slither will sometimes encounter an error. If you are testing a project that uses brownie or foundry, skip to the end to this section for an explanation on known open issues. Sometimes reading the Slither error message will guide you on how to solve the error, but sometimes it’s not very helpful. In these cases, I start by checking whether the program compiles by testing:
- Can I compile the project with the native framework? For example, if the project uses hardhat, try
npx hardhat compile. If this fails, you might have an error in your code or are missing dependencies. - If the native framework compilation succeeds, does the project compile with crytic-compile? Run
crytic-compile .If this fails, read the error messages to see if they guide you to a solution, or you might be using brownie or foundry and are straight out of luck. - Finally, if crytic-compile succeeds, run
slither .orslither . --hardhat-ignore-compile(or the corresponding ignore-compile flag for your framework). Slither might not recognize the proper build framework, in which case you can use the--compile-force-framework <framework>option to force a specific framework.
For some deeper background, crytic-compile is what Slither uses to compile the contracts before it begins static analysis, and sometimes crytic-compile doesn’t like the code you try to compile. If the three steps above don’t solve the issue for me, I take some keywords from the error messages I received from Slither and crytic-compile and search for Slither past issues and crytic-compile past issues. It can help to search both projects because sometimes the issue can get posted to the wrong project. If your searches don’t yield fruit, and searching on Google and Stack Overflow doesn’t help either, it might be time to post a new issue to the Slither GitHub.
Other Slither Troubleshooting
Other edge cases I have encountered include:
- The error message is related to missing fields in the “networks” section of hardhat.config.ts, which might be due to a missing .env file. If your goal is only to run Slither, you can delete the entire “networks” section of hardhat.config.ts because it’s only used for deployment tests and unit tests.
- Sometimes the package.json file doesn’t include all the dependencies for a project. You can install a single npm dependency individually for the local project, without modifying the package.json file, using
npm install <package-name>. For example,npm install @rari-capital/solmate. You can use npm install with a GitHub URL likenpm install https://github.com/OpenZeppelin/openzeppelin-contracts. - Test files sometimes interfere with Slither, so deleting the contracts/tests directory, if there is one, can help.
- Occasionally Slither doesn’t like how the imports are written in the contract files. You can use the
--solc-remapscommand line flag to fix this. For example, to tell Slither that the “@openzeppelin/contracts” path in an import statement actually means “./build/dependencies”, useslither . --solc-remaps @openzeppelin/contracts=./build/dependencies.
Using a Custom Slither Config File
If you’ve used Slither before, you may have been annoyed by findings concerning dependencies in the node_modules folder. A Slither config file can simplify your output and remove these findings. The full list of config file options is on the project page, but I normally filter out the node_modules folder at a minimum. This config file can have any name, but Slither will require the --config-file NewFileName argument to specify where the config file is if the default name is not used. For this reason, I find it easier to always use the default config file name, which is “slither.config.json”. Copy the filter_paths statement below into a file named “slither.config.json” located in the top level directory of your project (the same location where you run slither .) and Slither will use this config file for your project.
{
    "filter_paths": "node_modules"
}
The config file data above is will remove findings from the node_modules directory. You can go further and remove multiple paths from Slither results. For example, if you wanted to remove the “contract/Interfaces” and the “contract/Math” directories from Slither analysis, you could use the following config file.
{
    "filter_paths": "node_modules|Interfaces|Math"
}
Be aware that Slither documentation as of April 2022 suggests separating filter path values with a , instead of a |, which is incorrect.
Another useful config file option is to filter out findings of a certain risk level. For example, if we wanted to remove optimization, informational, and low risk findings, which often have some false positives that clutter the results output, we could use this config file.
{
    "filter_paths": "node_modules",
    "exclude_optimization": true,
    "exclude_informational": true,
    "exclude_low": true
}
Config File Alternative: Command Flags
The output of slither --help lists the optional flags you can add to the slither . command. Adding flags will give the same results as a config file. I prefer storing the config data in a config file, but that is my personal choice. For example, to duplicate the config file result above, you can use slither . --filter-paths "node_modules" --exclude-optimization --exclude-informational --exclude-low.
Bonus Feature: Slither Github Action
In February 2022, the Slither GitHub action was published. This can run Slither automatically each time a PR or commit is added to your project. Whether you would find Slither output after each commit to be useful is your choice, but filtering out the low risk issues using the config file above may help reduce the noise in the results.
Some Slither Weaknesses
There’s a few quirks with Slither that are minor and understandable for an automated tool with no setup required. It is worth mentioning these in case you encounter the same quirks.
The first quirk is that Slither doesn’t consider the modifiers involved when checking for findings like reentrancy. For example, Slither might identify a function as vulnerable to reentrancy even though there is a “nonReentrant” or “lock” modifier on the function. In other places, it might flag a function such as “selfdestruct” when the “onlyOnly” modifier exists on the function. It is always mandatory to check the output of any automated security tool, but I have learned to expect to see “nonReentrant” modifiers on most functions that Slither highlights as potentially vulnerable to reentrancy.
There is still plenty of room to grow for automated solidity security tools of the future. Several detectors could be added to handle Open Zeppelin dependencies alone to make sure they are used properly, let along other libraries. Possible checks could include: 1. checking for an initializer modifier on any function containing the letters “initialize” or “initialization” to prevent the possibility of multiple initializations 2. validating that inherited contracts are initialized properly if openzeppelin-contracts-upgradeable imports exist 3. checking the package.json for outdated versions of Open Zeppelin contracts with known security issues.
Slither Printers
I first saw the Slither printer feature demoed in this talk by Scott Bigelow. This feature is well documented. Printers are a way to visualize the functions in the project in different ways. There are 18 different printers, each providing a different view on the project code. To list the different printers, use slither --list-printers. Here are some examples of using the printers, and remember that adding the --hardhat-ignore-compile argument can speed up the process by skipping compilation:
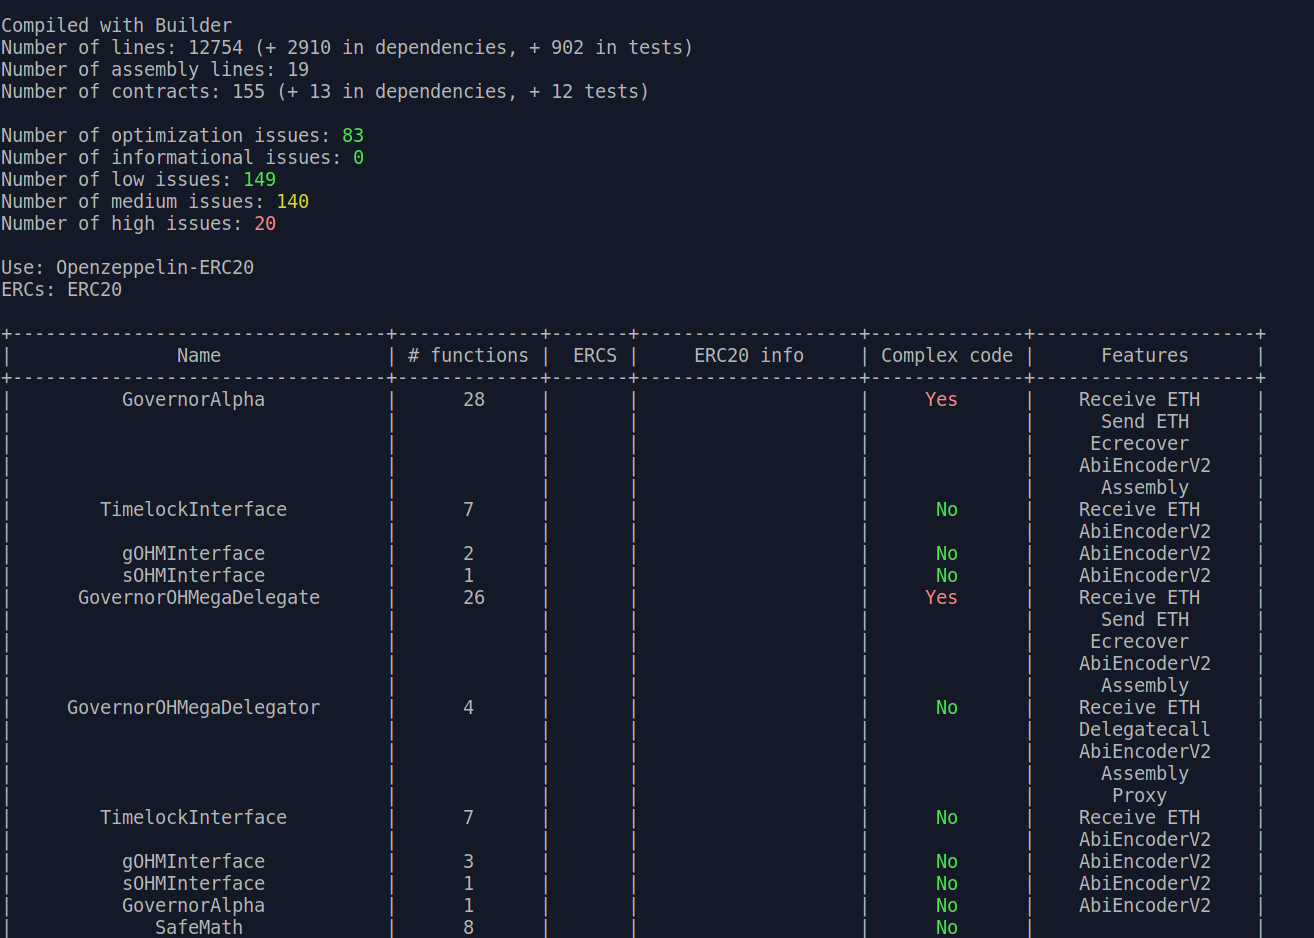
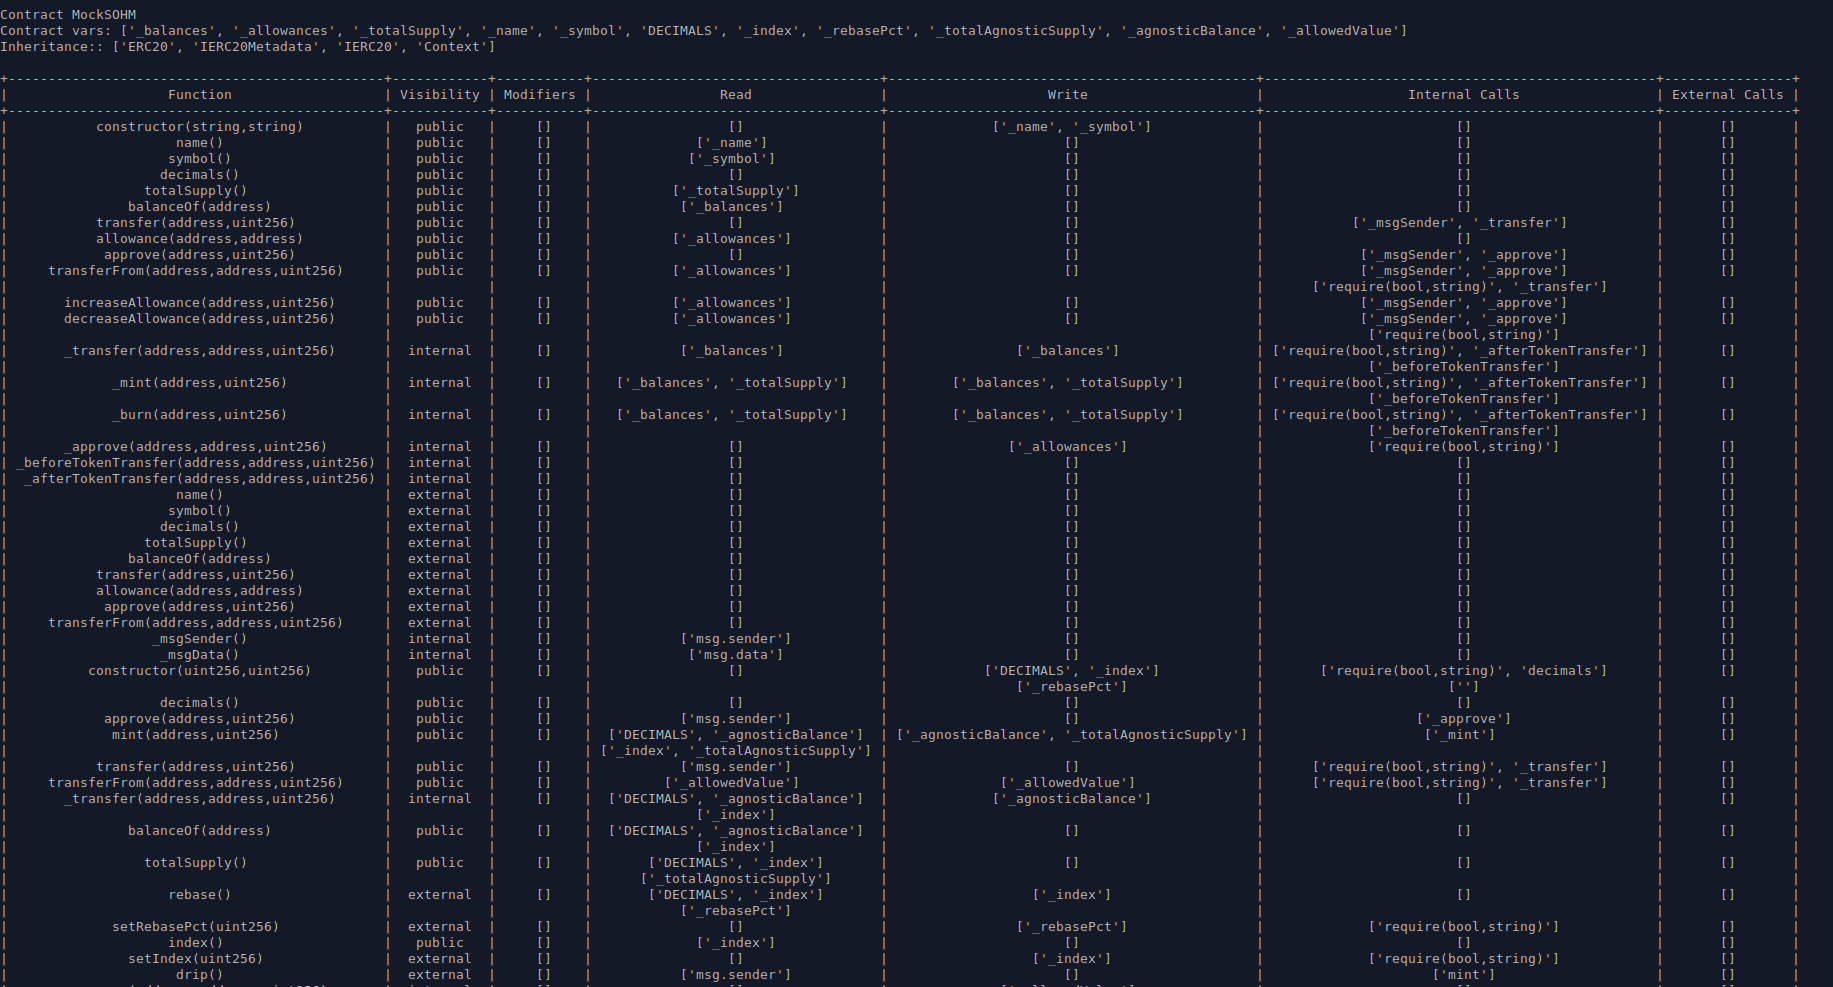
slither . --print human-summaryprovides a summary report of the Slither static analyzer output, along with extra informationslither . --print function-summaryprovides a summary of all functions with their corresponding modifiers, internal calls, state variable read/write, etc.slither . --print variable-orderlists the storage slots used by each variableslither . --print vars-and-authlists the state variables modified in each function and the authorization applied to msg.senderslither . --print constructor-callsprints the constructor function contents for each contract and its inherited contracts
The main difficulty I have had using these printers is sizing the output properly so the table renders neatly while the text is still large enough to be legible. I personally prefer the layout provided by VS Code extensions that serve a similar purpose.


Other Slither Tools
Slither’s static analyzer may be the most commonly used part of Slither, but wait, there’s more! Slither also includes the following CLI tools:
- slither-check-erc
- slither-check-kspec
- slither-check-upgradeability
- slither-find-paths
- slither-flat
- slither-format
- slither-mutate
- slither-prop
- slither-simil
Not all of these tools have much official documentation. I will only mention a few here.
Slither ERC Checker
The slither-check-erc tool is the tool I have used the most, besides the main static analyzer. Any time I encounter a contract that implements a common ERC token, I run this tool as a sanity check. If you’re really lazy, check the output of slither . --print human-summary and look for the ERCs output line to see what is automatically detected. The output of slither-check-erc lists whether all the functions required by the ERC specification are implemented. The output contains optional functions for the ERC too, pointing out possible areas for improvement even if the minimum requirements are met. Using slither-check-erc is very similar to running Slither, but the contract name must be provided as an input argument. The command to run this tool on an ERC20 token contract, which is the default ERC for the tool, is shown below.
slither-check-erc . ERC20ContractName
slither-check-erc supports the following tokens: ERC20,ERC223,ERC165,ERC721,ERC1820,ERC777,ERC1155. To test a token other than ERC20, include the --erc argument.
slither-check-erc . --erc ERC1155 yAcadToken1155
Slither Flattener
The slither-flat tool flattens a codebase. What this means in practice is that all contracts for a project are reorganized into a single folder. This process is most useful to prepare the contracts for another tool like mythx that might encounter problems with external contract imports. You can see the results yourself using slither-flat ., which will store the output files in a new directory named “crytic-export/flattening”.
Slither Upgradeability Checker
The slither-check-upgradeability tool automatically checks contracts that use the delegatecall proxy pattern. Because of the evolving nature of proxy architecture and strategies, I haven’t used this tool as much as expected, but if you do encounter this scenario, the tool is definitely worth using. It can be run with slither-check-upgradeability ContractName.sol ContractName.
Writing Custom Python Code with Slither
You can use Slither’s intermediate representation to write your own Python scripts.
Here’s one custom code example that prints out the contract name and function name if a function match the criteria 1. the function is public or external 2. state variables are modified in the function 3. there is no onlyOwner modifier on the function. Save this code in a Python .py file in the same top level directory where you run slither .. This python script is run like any other python script, using python3 filename.py.
from slither.slither import Slither

slither = Slither('.')

for contract in slither.contracts:
    for function in contract.functions:
        if function.is_constructor:
            continue
        if function.visibility in ['public', 'external']:
            if len(function.state_variables_written) > 0:
                if not 'onlyOwner()' in [m.full_name for m in function.modifiers]:
                    print('Contract: '+ contract.name)
                    print('>>Function: {}'.format(function.name) + ' is unprotected!')
What to do with Brownie and Foundry Projects?
There are open issues that brownie and foundry don’t currently play nice with Slither (technically the issue is with crytic-compile, which Slither relies upon), so what is the workaround? My simple hack is to create a new hardhat project, copy the contracts over, fix dependencies as needed, make sure the code compiles, and run Slither on the hardhat project. Here are my steps to doing this.
First, check that you have hardhat installed globally on your system by viewing the help message from npx hardhat --help. If you see the hardhat help message, then setting up a fresh hardhat project is as simple as running npx hardhat in the directory where you want to store the project, selecting the “Create a basic sample project” option when asked, and answering the prompts (usually by tapping enter to accept the defaults until no more prompts appear).
A few final steps are needed to copy over the original project to the blank hardhat template.
- Delete the “contracts” directory from the sample hardhat template, because it contains a default Greeter.sol file that we don’t need. Then copy the “contracts” directory from the original project to the new sample project.
- Open the original package.json file and copy the “scripts” and “dependencies” portions of the original package.json file to the new package.json file in the sample hardhat project.
- In the new sample hardhat project hardhat.config.js file, set the proper solidity version based on the version used in the .sol files in the “contracts” directory.
If you’re lucky, npx hardhat compile should compile the project normally now. If you’re not lucky, the Slither error messages can often guide you in the right direction, especially if you’re willing to tinker around with the config files and/or imports to get everything working properly. Check out the troubleshooting section for more ideas. If the only goal is to run Slither, I don’t worry about copying the tests or other files because Slither only cares about the files in the contracts directory.